4.3 Image processing window
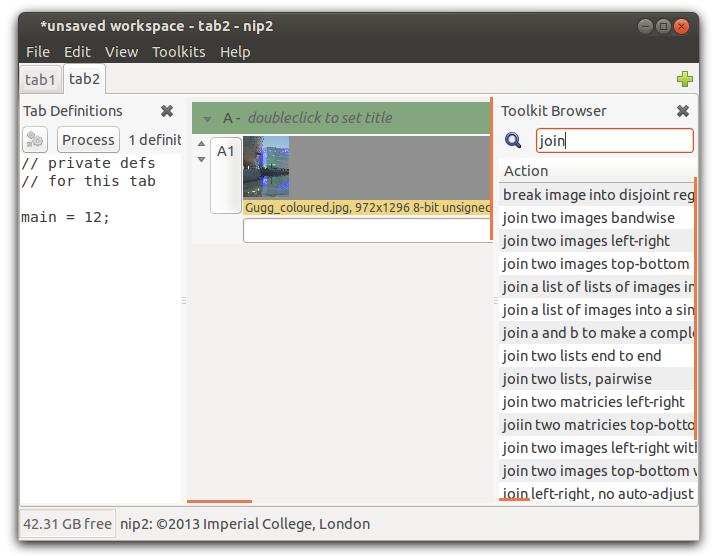
Figure 4.5 shows nip2’s main image processing window.
The centre area is the workspace, the left-hand area is a
pane you can reveal to write custom definitions for this
workspace (see View / Workspace Definitions), and the
right-hand pane is the toolkit browser (see View / Toolkit
Browser).
Drag with the middle mouse button to scroll the
workspace window. Drop a file on to the workspace
background (from your file manager) to load that file. If you
right-click on the workspace background, a useful menu
will appear.
-
Workspace
- A workspace is split into a set of separate
tabs. Right-click on a tab to get a useful menu.
Press the add icon at the right to make a new tab.
You can drag tabs between workspaces, or drag a
tab to the desktop to make a new workspace. Use
the syntax tab1.A1 to make references between tabs.
-
Tab
- This area displays the current tab. Tabs are divided
into columns of objects which each behave rather
like windows: they can be moved around, folded
away, loaded, saved and deleted.
-
Current column
- One column is the current column.
This is the column to which all new objects are
added. Single-left-clicking on the title bar of a
column makes that the current column. See §4.3.1.
-
File, Edit, View
- Use the File menu to create or save
workspaces, to open workspaces or load other
objects into this workspace, to merge workspaces
and to search for workspace backups. Use the Edit
menu to select, group, delete and duplicate sets of
objects. Use View to show and hide elements of the
main window, and to set the object view mode.
-
Toolkits
- This menu contains all of
the image processing functions which are currently
loaded into nip2. They are generally grouped by
object type: all of the operations on matricies are
under Toolkits / Matrix, for example.
If you select one of these image processing
operations, nip2 will apply that operation to the
bottom few items in the current column (however
many are necessary — two items for Math /
Arithmetic / Add, for example), or alternatively, if
you have selected some objects explicitly, it will try
to apply the operation to the selected objects. See
§4.3.3. As you move the mouse pointer over menu
items nip2 tries to display some helpful information
about the operation, including the number and type
of arguments the operation expects.
-
Toolkit Browser
- This side panel shows all the image processing operations again, but this time as a large
flat list you can easily browse. Type into the search
box at the top to filter operations by keyword.
Doubleclick on an item to activate it.
-
Tab Definitions
-
This side pane shows private definitions for this
tab. Programs you write here are loaded and saved
with this workspace. See the Programming chapter
for details on nip2’s programming language.
-
Free space
- This displays the amount of disc space you
have left in your temporary file area. See §A if
you want to change the directory nip2 uses to store
temporary files.
If you left-click on the label, it changes to display
the space nip2 has free internally for performing
calculations. You can change this limit in the
Preferences workspace. Click again to switch back
to disc free.
If you have objects selected, this area changes to
show the names of the selected objects.
-
Status bar
- As you move the mouse pointer about the
window, this bar tries to display useful information
about the thing you are pointing at.
4.3.1 Columns
Columns are split into a number of areas:
-
Column name
- Each column has a name. You can pick
any name you like when you make a new column
with File / New / Column. There’s no way to rename
a column, unfortunately. Objects in the column are
named using the column name, plus a number.
-
Column title bar
- Drag with the left mouse button held
down on the column title bar to move the column
around the workspace. Double-left-click on the
title bar to change the comment attached to the
column. Hold down the right mouse button on the
column title bar to pop up a useful menu.
The items in the menu let you edit the caption,
select all the objects in the column, make a new
column which is a copy of this column, save the
column to a file, convert the column into a menu
item (see §4.3.6) and remove the whole column.
-
Column fold button
- Left-clicking on the fold button
folds the column away. Use this to hide columns
which you still need, but which you are not
interested in just now.
-
Expression entry
- You can perform calculations by
typing expressions directly into this box. For
example, try entering the following expressions,
and pressing Return:
2 + 2
A1 + 120
"My cat likes\nlasagne"
fred = 12
The last example shows custom button name creation.
Normaly nip2 will pick a name for you, but you can
chose your own.
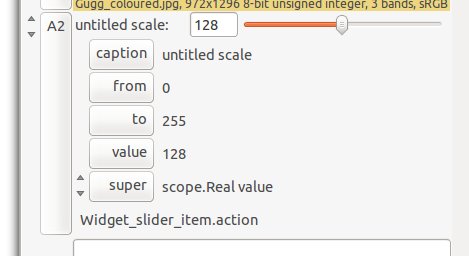
4.3.2 Rows
A column holds a number of rows. Each row comes
in four main parts, not all of which are visible for all
row values. Rows which represent classes have a pair
or up/down arrows to the left of the row name button
which you can use to control which parts of the row are
visible.
-
Row name button
- Each row has a name. The name
is normally formed from the name of the current
column, plus a number.
If you double-left-click on the row name button,
nip2 will pop up a viewer or dialog box for the
value of the row. If you left-click, nip2 will select
that row and deselect all other rows. If you click on
an empty space in the workspace, it will deselect
all rows. If you Ctrl-left-click, nip2 will toggle
selection of that row. If you select one row and then
Shift-left-click on another row in the same column
it will select the second row and all the rows in
between. If you drag with the left button, you can
change the order of rows in a column. Hold down
the right mouse button for a useful menu. If you let
the mouse linger over a button, a useful tooltip will
appear.
-
Graphic
- If the row’s value is a class, and if the class
is an instance of one of nip2’s graphic classes, then
nip2 will draw a graphic representation of the row’s
value. See §6.12.2 for a more detailed explanation.
-
Members
- If the row has a class for a value, then nip2
will draw a sub-column listing the class members.
Subcolumn members are in turn rows themselves.
-
Text
- Finally, the text part normally shows a text
representation of the row’s value. If you left-click
on the value, it changes to show the formula which
generated that value. You can edit the formula and
press Return to change it.
Alternatively, selecting View / Show Formula
toggles between displaying values for objects and
displaying the formula.
Object name colours
nip2 changes the background colour of the row name button
to show the state of the row. If background colours
are not visible (perhaps your theme turns them off),
try turning on the Display LEDs in workspace option in
Preferences.
Green means the row is selected (click on the background
to unselect), red indicates an error (right-click on the row
button ans select Recalculate to see the full text of the error),
brown indicates that the row value is out of date and needs
recalculating and the various blues indicate parent and child
relationships.
4.3.3 Applying operations to objects
There are three ways you can apply image processing
operations to objects in your workspace:
- Select the object you want to apply the operation to
by single-left-clicking on the object name. When
you single-click, the object name will change
colour to show that it is selected, and nip2 will
display the name of the selected object at the left
end of the status bar (this is useful if the selected
object is scrolled off the edge of the window).
You can
select additional objects with Ctrl-left-click and
Shift-left-click. This is necessary if you want to use
an image processing operation that takes more than
one argument.
Once you have selected the rows (sometimes you
need to select them in a certain order), click on
the processing operation you want from the Toolkits
menu.
- If there are no objects selected when you click
on an image processing operation, nip2 uses the
bottom few items (as many as are needed by the
operation) in the current column.
- You can also type your formula directly into the
expresion entry line at the bottom of the selected
column. Chapter 6 describes the syntax in detail,
but it’s approximately C.
4.3.4 Batch processing
If you select a number of rows and then click Edit / Group,
nip2 will group the rows together. Now if you select the
group and click on an item in the Toolkits menu, nip2 will
apply that operation to every item in the group. You can
group groups, and you can mix grouped and non-grouped
rows freely.
If you save a group, nip2 will write each item in the
group to a separate file, incrementing the filename each
time.
4.3.5 Error handling
If an object in your workspace has an error (for example,
if you are trying to join two images of different types), then
the object name button will turn red to show that this object
contains an error and the tooltip for the button will show the
error message.
4.3.6 Making menu items out of columns
If you make a column that does something useful,
you can make it into a menu item by following these
steps:
- Make your column look nice. Drag with the
left mouse button on the object name buttons to
re-order items in the column, and add comments to
explain what are the input fields and what are the
output. Double-click on the column title bar to add
a helpful title to the column.
Add a comment by typing your text (enclosed in
double quotes) into the line at the bottom of the
column. Left-drag the row to the right place.
- Select Make Column Into Menu Item from the column
title-bar menu, see §4.3.1.
This will open up a new dialog box which you can
use to set a name for your new menu item and the name of the top level menu the item should be
added to.
- That’s it. You’ll be prompted to save your new
toolkit when you try to quit nip2. We recommend
you just say OK to the suggested location for
the file. Edit your menus with the programming
window, see §4.4.