Figure 4.1: The display control bar
Figure 2.2 shows nip2’s image view window with all the toolbars turned on.
If you press i (or +) with the keyboard focus on the image you will zoom in on the pixel your mouse pointer is over. Press o (or -) to zoom out again, or press the number keys 1, 2, 4 and 8 to jump straight to a particular magnification. If you hold down the Ctrl key while pressing these numbers, nip2 will zoom out by that amount. If you press 0 (the number zero), then nip2 will pick a magnification or reduction which fits the image to the size of the window.
When the image is too large for the window, you can use the scroll bars to move about the image. With the keyboard focus on the image the cursor keys left, right, up and down move a few pixels in each direction; hold down Shift as well to move a screenful at a time; hold down Ctrl as well to jump to the extreme edges of the image.
You can also drag with the middle mouse button to pan around the image. Use the mousewheel to pan up and down, hold down Shift and the mousewheel to pan left and right. Use Ctrl and the mousewheel to zoom in and out.
Use the View menu to add extra elements to the window. You can turn the status bar on and off, and you can add a display control bar, a paintbox and a set of rulers to the window.
If you select View / Toolbar / Display Control, nip2 will add a bar to the top of the window which you can use to change the contrast and brightness of the image you are viewing. The left-hand slider and text box set the gain for the image: each pixel is multiplied by this amount before display. The right-hand slider and text box set the offset: each pixel has this value added to it before display. This is useful for boosting the brightness in dark areas of images.
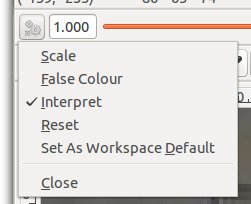
If you click the left mouse button on the arrow to the left of the display control bar, nip2 pops up a menu of useful display functions — see Figure 4.2.
Scale searches the area of the image you are viewing for the darkest and brightest points and chooses settings for the gain and offset sliders which will stretch the image to use the full range of your screen. False colour tries to make small differences in brightness more visible by colour-coding them.
If Interpret is turned on (it is by default), then nip2 will look at the Type field in the image header, and use that as a hint when transforming the image to a viewable form for you. This is usually the behaviour you want. Reset moves the sliders back to the default positions of 1.0 and 0.0. Set As Workspace Default makes the current display bar settings the default for all new image windows in this workspace. Finally, Hide removes this display control bar.
If you select View / Toolbar / Rulers, nip2 will add rulers to the edges of the window which you can use to measure numbers of pixels. If you left-drag from the ruler, you can create a guide. Guides are useful for lining up other things in the view window, and also affect paint box actions. A right-button menu on the rulers lets you use a mm scale rather than a pixel scale, and controls whether the Xoffset and Yoffset header fields are used.
If you select View / Toolbar / Paint, nip2 adds a paint bar to the top of the window. You can use the paint bar to do simple edits to the image being displayed. See Figure 4.3.
While the paint bar is very limited, it does have two useful features. First, it can paint with any pixel value, even complex numbers. For example you can take the fourier transform of an image and paint out the peaks. Secondly, it doesn’t operate on a memory copy of an image, it operates directly on the file on disc. This means that you can paint very quickly on images of any size, but it does make the paint bar a bit dangerous.
Normally paint actions are live, that is, every time you paint something all the objects which depend on the thing you painted will recalculate. This can sometimes cause annoying delays: there’s a preferences option to turn off automatic recalculations for the paint bar.
The Undo and Redo buttons move forward and back though paint actions. The Clear button wipes the undo/redo history (useful if memory is getting low). There’s an option in the preferences workspace which controls the number of undo steps nip2 tracks.
The slider sets the nib diameter for drawing operations, the black square is the current ink colour (you can drag and drop colour, or pixel values, from other parts of nip22), and the text box at the far right is the text that will be drawn by the text tool. The paint tools will ‘snap’ to guides, points and regions, so you can line things up easily.
You can mark regions on images by holding down Ctrl and dragging down and right with the left mouse button. You can move the region about by dragging on the label with the left mouse button; you can resize it by dragging with the left mouse button in the border; you can get a useful context menu by right-clicking on the label; and you can pop up a box which will let you edit the region numerically by double-left-clicking on the label.
If you drag up and left, you will make an arrow. If you hold down Ctrl and just click the left mouse button, you will make a point. If you drag from a horizontal or vertical ruler, you’ll make a guide. Guides are useful for lining up other things in the view window.
View / Image Header shows the image metadata and history. Use the search box to filter large metadata sets.
The File menu contains two useful items: select Replace Image to change the image which is being displayed in the window (you can also drag and drop new images in). Select Save Image to save the image you are viewing to a file. See §4.2 for details on nip2’s load and save dialogs. Use File / New to make regions, points, arrows and guides without the mouse.